Recover Deleted Photos for Free with These Tips
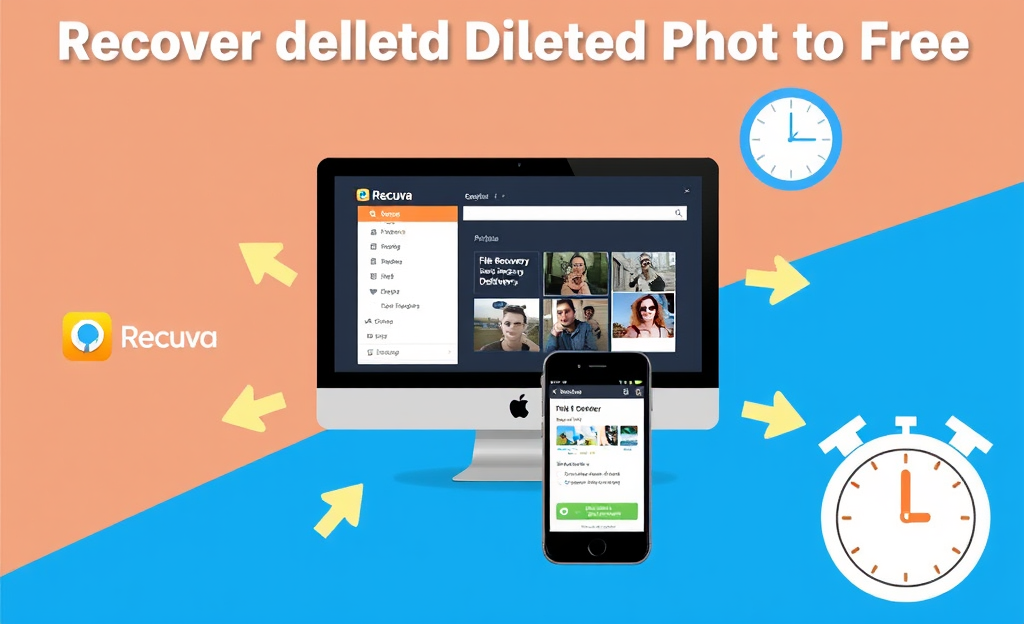
Photo Recovery can be a daunting task, especially when precious memories seem lost forever.
Fortunately, there are a variety of methods and tools available that can help you retrieve deleted photos with ease.
In this article, we will explore several effective strategies for recovering your valuable images, including the use of software like Recuva for Windows, handy apps on Android devices, and the built-in features of iPhones.
Whether you’re a tech novice or an experienced user, our guide will provide you with practical solutions to aid in your photo recovery efforts.
Essentials of Free Photo Recovery
Photos hold priceless memories and losing them can feel devastating, especially when they vanish unexpectedly from your device.
This is where free photo recovery methods can make a difference, offering an accessible way to retrieve your deleted images without adding financial stress.
Whether it’s due to accidental deletion, software crashes, or formatting issues, having no-cost solutions helps users quickly respond and regain digital memories.
Disk Drill and Recuva are among dependable free tools that allow fast scanning and recovery on Windows devices.
Acting quickly significantly increases your chances of recovering photos before the data gets overwritten.
Most recovery tools rely on intact data clusters, which start to break down with regular device use.
Prompt action ensures better restoration quality while providing peace of mind.
Options vary depending on the platform, but the best-known recovery approaches include:
- Use Recuva or Disk Drill for Windows recovery
- Install apps like File Recovery on Android phones
- Check the ‘Recently Deleted’ album on iOS devices
Recover with Recuva
Step 1 – Download Recuva Visit the official Recuva download page and choose the free version.
Save the installer somewhere other than the drive where the lost photos were stored.
Stop using the drive immediately to avoid overwriting deleted files.
Step 2 – Install Recuva Run the downloaded file and follow the installation prompts.
Deselect any optional software during setup to keep your system clean.
Step 3 – Launch the Recuva Wizard After installation, launch Recuva.
The Wizard appears by default, simplifying the recovery process for beginners.
Step 4 – Choose File Type Select “Pictures” when asked what type of files you’re recovering.
This helps Recuva narrow its search and speeds up scanning.
Step 5 – Select File Location Indicate where the photos were deleted from.
If unsure, choose “I’m not sure” to scan all drives, though this takes longer.
Step 6 – Start the Scan Opt for a deep scan if the quick scan doesn’t find your files.
The deep scan takes more time but increases the chance of restoring photos.
Step 7 – Recover Your Photos Once the scan is complete, preview the files.
Select only the images you need and restore them to a separate drive or folder to prevent overwriting existing data.
Relevant tip: Use Recuva as soon as deletion occurs—the more time passes, the lower the recovery success rate.
Try Disk Drill Free Edition
Disk Drill Free Edition offers a straightforward installation process, guiding users step-by-step to quickly launch the tool.
Once installed, it allows free file recovery of up to 500 MB, which is ideal for small photo batches.
Starting a scan requires only selecting the drive and clicking the scan button, making it accessible even for those unfamiliar with data recovery tools.
Disk Drill supports major file systems like FAT32, NTFS, exFAT, and even HFS+ or APFS, meaning it works with both Windows and macOS file structures seamlessly.
Relevant features like previewing recoverable images before restoring them add practicality, especially when storage is limited.
Although the data cap is a major limitation, the tool still delivers noticeable value in recovering accidentally deleted images from USB drives, SD cards, internal disks, and external hard drives.
Its user interface is clean and efficient, although some users note it may lack speed during deeper scans.
For casual users or quick photo retrieval tasks, this free version is a strong option to consider.
| Pro | Con |
|---|---|
| Recovers up to 500 MB of photos for free | Limited to 500 MB of total recovery in the free version |
| Supports many file systems and storage types | No phone support and runs slower on deep scans |
DiskDigger Photo Recovery App
DiskDigger efficiently recovers deleted photos from internal memory and SD cards on Android devices.
It supports popular image formats like JPG, PNG, and even some RAW formats.
The app operates by scanning the device’s storage to locate deleted files that haven’t been overwritten.
Download DiskDigger from Google Play to begin restoring photos quickly.
Relevant text: this tool is lightweight, does not require root for basic scanning, and allows uploads to cloud storage or email sharing.
After installation, open the app and choose between a basic or full scan.
Select the storage to search and tap “Scan device.” Once completed, browse results, select images to recover, and save them.
Recovery works best if photos were recently deleted.
Review app permissions carefully to maintain file access while protecting privacy.
Use this as a quick and reliable solution before files are permanently overwritten.
Dumpster Recycle Bin App
Dumpster acts as a virtual recycle bin for Android, instantly storing deleted files such as photos and videos so they can be easily recovered.
Rather than deleting files permanently, users can retrieve them directly through the app with just a few taps.
Upon installation, Dumpster requires no root access and automatically begins capturing deleted content.
Its free version supports basic recovery functions, while advanced file types, cloud backup, and ad-free use are part of its in-app purchases.
To experience its utility firsthand, download the Dumpster app on Google Play Store.
Setting up Dumpster takes less than a minute.
Once installed and opened, it starts functioning as a background recovery system without user intervention.
To restore deleted photos, simply open the app, browse the recovered files, and tap ‘Restore’ to return them to your device gallery.
Files are stored in the app unless manually removed or expired based on storage settings.
Clearing system cache can wipe recoverable data
, so users should adjust system cleaner apps accordingly to avoid permanent loss.
Additionally, enabling cloud storage and deep scan features under premium options further boosts recovery accuracy and prevents data loss beyond local device limitations.
Retrieving Photos on iPhone with the Recently Deleted Album
To recover your photos on iPhone, begin by opening the Photos app.
At the bottom of the screen, tap Albums.
This brings you to a section where all your albums are organized, including shared, people, places, and media types.
Continue scrolling until you reach the Utilities area, where you’ll find the Recently Deleted album.
This folder stores images and videos that were deleted from your device.
Once inside Recently Deleted, browse the thumbnails and tap the photo or video you want to restore.
After selecting, use the Recover button to return them to your main library.
You can select single or multiple photos depending on your needs.
Apple designed this feature knowing users often delete files by mistake, offering a quick chance to reverse their actions while keeping the process simple and accessible.
Be aware that deleted items remain in the Recently Deleted album for only 30 days before they are permanently erased from the device.
After that deadline, recovery requires alternate methods like restoring from an iCloud or iTunes backup.
For more details on this, refer to Apple’s official photo recovery guide which explains how deleted content behaves and what impacts its availability over time.
Best Practices to Protect and Recover Your Photos
Create regular backups to avoid the devastating loss of memories due to accidental deletion or system failure.
Use cloud solutions like Google Photos or external hard drives to keep duplicates of your photo collections.
Act immediately after noticing photo loss—every moment spent using your device increases the chance of overwriting recoverable data.
Minimize usage of the affected device and do not install new apps, capture photos, or update firmware.
Instead, install recovery tools such as Recuva or Disk Drill on a different device to begin the photo recovery process safely.
If you’re using a Mac or Windows system, stop writing new data to the affected volume immediately.
Update your recovery knowledge regularly and bookmark trustworthy guides like this expert recovery guide to stay prepared.
When possible, consult professional recovery services for severe cases, but for most, acting fast and choosing the right tools gives you the power to restore what’s lost.
“Photo recovery always favors the informed and the fast.
The fewer changes you make after deletion, the higher the success rate.”
Photo Recovery doesn’t have to be a stressful experience.
By employing the right methods and tools, you can increase your chances of successfully retrieving lost images.
Remember, acting quickly is key to enhancing your recovery odds.


0 Comments